Tag Archives: Fashion Show

Tricks and tips on how to do Ombre Lips


Hi there! Today we will talk about how to create and define ombre lipstick!

Ombre means having two different colours that are monochromatic.

a96820ee46c5c8df1645ff32033a81a6

Ombre isn’t just for your hair! The sexy, ombré  lip look is one you’re going to want to wear always, and shout to the world about it. Be creative and bold with your makeup and try out this ombre lip look.

Ombre lips can look awesome, but if not done correctly they can make you look very tacky! The secret to doing ombre lips is to first try it out with your regular lip colors. Play around with different hues that merge well together and once you are satisfied with the results only then step out into the open.

25-OmbreLips

Step by Step Ombre Lips:

Apply concealer over your lips to hide the natural colour.

Use the dark lip liner to create a line around the edge of your lips as you would normally. Add more of this dark colour lip liner to the corner of your lips bringing this dark colour in towards the middle, but do not colour all of your lips with this shade. You can also extend this line and thicken it at the top and bottom of your lip if you wish.

Apply your pale colour to the middle of your lips that do not have the darker lip liner on them. Press your lips together once or twice but do not smear the colours together by rubbing your lips side to side or back and forth. Simply press your lips together and pull apart again in one smooth motion.

At this stage you can use your lip brush or cotton bud to blend the edges of your colours together to create a fading effect.

Thank you guys in tuning in.

Tomorrow we will talk about do’s and don’t about day time makeup!


Lipstick do’s and don’t


Lipstick is an essential part of almost every woman’s daily makeup routine. However, many women shy away from the red tones they find in the cosmetic aisle. Fortunately, you can pull off those brave shades with a little lipstick know-how. Here are ten dos and don’ts of wearing red lipstick:


images-1


1. WEAR DARKER FOUNDATION.

If you’re going to go bold with your lip color, you’ve got to have a complementary backdrop for your face. For those with lighter skin tones, it’s a good idea to choose foundations that will provide darker, olive bases. Red lips can be too much of a contrast against pale skin. The darker your lips are, the darker your foundation should be.

2.DON’T BE AFRAID TO BLEND COLOURS.

Do you like the look of red lipstick, but think it might be too loud for you? There’s an easy solution: customize your shade. Simply take a lighter hue like coral or mauve and blend it with that rose or burgundy you’ve been eyeing. The result will be a more muted tone that nearly anyone will be comfortable wearing.

3. USE IT FOR THE RIGHT OCCASION.

While everyone loves red, luscious lips, the look isn’t appropriate for every social situation. Some of the deeper shades can be a little jarring to people you run into at the gym or the kids’ soccer game. Likewise, you want everyone to be listening to your business proposal at that morning office meeting, not staring at your lips. Only paint your kisser red when you know you’re dealing with a fun, playful atmosphere, such as a night out with the girls. Then, you’ll be one step ahead in painting the town red!

4. DON’T OVER DO IT.

If you want to avoid all the lipstick smudges and stains, you can start by only applying a light coating to your lips. This is especially important for red lipstick since it’s easier to spot on teeth and collars. Rolling once or twice around your lips should be sufficient to achieve the desired effect. For even more control of your coverage, spread the lipstick using a lip brush. Just remember that a little dab will do you.


_MG_4759


Thank you! for your time on reading the tips and tricks for today!

Tomorrow we will talk about the lipgloss when and where to wear it!


Perfect Smokey Eyes look part 2

Your smokey eye style makeup is comprised of a collection of different looks you create. Each element of makeup is characterised by its colour, finish, and performance. If your makeup is chosen correctly and your looks are skilfully combined, you are a woman with makeup sense.

The application


Smoky eyes application 1

Outline your eye contour with a black eye pencil, all the way around. Make the line thicker along the upper lashes.

Smoky eyes application 2

With a brush or a sponge applicator, apply your base colour eyeshadow on the mobile eyelid and above the crease, about halfway to the eyebrows, blending slightly.

Smoky eyes application 3

With a pointy sponge applicator, apply contour colour eyeshadow all the way around your eyes, blending it well with the pencil line.

Smoky eyes application 4

Half-close your eyes and apply contour colour in the crease.

Smoky eyes application 5

You will now need to define the outside corners of your eyes using a horizontal “V” shape. The position of the pointy end of the “V” will control the apparent shape of your eyes.

Smoky eyes application 6

With a medium-sized soft round brush (you can also use a flat one, holding it sideways), blend the eyeshadows on the upper eyelid. With a flat brush, blend the eyeshadows on the lower eyelid.

Repeat your contour colour application with a sponge, as many times as needed to achieve a deep shade. Blend again with brushes after every application.

Apply highlight colour eyeshadow or facial powder under your eyebrows to ease the blending of the dark contour and add some volume to your eye makeup.

For an irresistible deep regard, outline the inside contour of your eyes with eye pencil. Use darker-than-usual eyebrows and lots of mascara to finish the look. Your eyes should now be smokier then ever before!

To keep your bright eye makeup in balance, try a stronger blush, and keep your lips pale with a light gloss application.


Don’t forget the perfect smokey eyes are all about blending and practice.

Smokey Eye
Smokey Eyes

See you all tomorrow as we discuss about Lipsticks and will give you amazing tips how to get perfect lips by applying the lipstick in a correct way

How to apply Kryolan Eyeliner the best possible way.


All about eyeliner!  What’s that you say? You already know all there is to know? We thought so too. That is until we learned these 8 unique tips, tricks, and facts.


We will guide you as to what is the best eyeliner to use and for what occasion.


Get it right and you will look amazing but get it wrong and an in perfect line or application then it will spoil the whole look!

1. White eyeliner can make your eyes look more awake. Swap your regular black pencil for white when you’re looking a tad on the tired side and say good morning to brighter eyes.

2. Dark eyeliner was actually created, in part, to protect people from the harsh rays of the sun. So, if anything, you have an excuse for owning ten identical similar shades of black eyeliner. But don’t forget: there’s no substitute for SPF!

3. Winged eyeliner can be worn on both top and bottom lash lines—at the same time! Choose two contrasting colors for an edgy makeover and read this tutorial for instructions.

4. Ever mess up on your liner look (hello, eyes that are suddenly two different sizes)? No worries, simply apply makeup remover to a Q-tip to erase the error without smudging or starting over.

5. Connect the dots instead of sweeping liner on for more precise results. Just dot with cream liner and connect with a smudge brush for perfect liner, every time.

6. You can use more than one eyeliner color at once—trust us. In our Rock Doll makeup tutorial, Emma Willis shows us how to rock three liners at once for a dramatic evening look. Try it out and report back!

7. Purchase a less-than-effective eye pencil? Instead of returning it, take a cue from ladies of the 80s: swipe it over an open flame to heat it up and it will glide right on. Quick tip: this trick works well for dramatic liner looks, too.

8. Getting a winged eyeliner look is way easier than you think. Choose which two-step process is right for you and voila—pro eyes in seconds!

9. Waterproof Mascaras.

Waterproof liquid liner enables you to create a variety of eye-opening effects—from thin, precise lines to thick, dramatic looks. The formula glides on with ease, dries quickly and won’t smudge or run day-into-night.

The fine marker-like tip offers precise application for everyone from novices to pros and results in beautifully defined eyes that will leave a lasting impression.

Benefits:

  • Waterproof and easy-to-use
  • Goes on smoothly without skipping, smudging, or pulling
  • Lasts all day long!


images
Eyeliner Pencils
images-1
Eye Make Up palette
Unknown
Perfect Eye Liner


Stay tuned for tomorrow as we discussed all about Smokey Eyes!


The Lipstick Makeup Institute and YH Studios is at Mahiki Dubai

13124445_1010842575670169_515353447846566195_n

The Lipstick Make Up Institute and YH Studios is tied up with Kalendria to give all you honeys the ultimate experience on Ladies Night at Mahiki Dubai

We did the touch ups makeup to all beautiful ladies who attended the night! It was a superb experience !

It was wonderful night, with all the unlimited cocktails and the Dj’s music that give everyone to dance at the floor.

Check out behind the scene of the event!

_MG_6584email


_MG_6631eamil

_MG_6581email_MG_6636email


The Lipstick make Up Team are Sponsors of The Velvet Event At The Versace Hotel Dubai

The Lipstick Team will creating amazingly glamorous looks for the Models to float down the Catwalk on Saturday 14th May at The Versace Hotel Dubai Creek.

The team is really excited to be working together and to be part of such a high end event.

Shot on the front is a combination of The Lipstick make Up Institute and YH Studios Photography.

velvet1

Congratulations to Our Student who just completed The Silver Make Up Course.

We are so proud of our Leila who progressed so much in her 5 days with us. She achieved An International Certificate and 3 amazing images for her Portfolio which is all included as part of the Makeup  Course. We have our sister company , YH Studios DXB who are always very involved with the students explaining just how the lights react with make up. Media Make Up is  completely diffrent makeup just for events, parting or just going out.

This is the great advantage that having a professional photography studio as part of the package. The students on the courses gain such a great advantage as they understand and can apply all the tips and techniques to their working life once they leave the comfort of our Institute.

We are like a family here with knowledge and experience to share!

Just look at the images that Leila left The Lipstick Makeup Institute with. I am very proud of her achievements.

There are so many makeup Artists who do not have any professional images. Com e and join us and get the best of everything!


_MG_4643s_MG_7260e_MG_7887s

What is full contouring and when are we using it


For the full contouring and highlighting we can use liquid foundations or cream products.

The queen of all contouring  and highlighting is Kim Kardashian and she is sharing her tips and trick with us:

  1. Don’t be afraid to contour more of your nose than you think is necessary. Not only is Kim’s nose shaded from the browbone all the way down, but most of the skin on her nostrils is shaded as well. This will create a serious slimming effect.
  2. Always highlight down the center of your nose. A perfect contour is nothing without a highlight! You should create a stripe of light color down your nose, starting from between your brows down to the tip. Keep the line steady and symmetrical, but feel free to play with the width (depending on how narrow you want your nose to appear).
  3. Add subtle shade to the tip of your nose. You have to look very closely to see this, but the end of Kim’s nose has a bit of contour on it. This will prevent your nose from looking too long. However, you should skip this step if you have a short button nose.
  4. Use matching contouring colors in the hollows of your cheekbones and around your forehead. Everything should look natural and seamless — using the same products and shades will prevent any weird mismatching issues while balancing your overall look.
  5. Finish your contouring look with a bit of shading along your eye sockets. This will complete the illusion of goddess-level bone structure.
  6. Don’t forget to blend! While you do want to maintain the integrity of the lines you’ve created as you buff them out, they should not look like actual lines drawn on your face.

header-211719_w650


Tip of the Day: Use your beauty blender or sponge to blend the contours and highlights

Choosing the Blush Colour


We have all seen those people that were far too much blusher and look a bit like a clown. This often causes many of us to stay away from blusher and not use it for fear of looking like a fool. The aim of this article is to explain the benefits of using blusher and how to apply it to get the right effect.

When Blusher is used correctly it will add a natural glow to the skin as well as adding contours to the face. It is a great tool and should appear in any woman’s makeup bag.

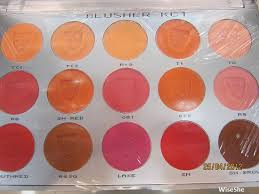
What Type of Blusher?

When looking for blucher you will find you can get it as a powder, cream of even a gel. They all have different qualities and it is a good idea to pick one that you feel comfortable using. The creams and gels will stay on the longest but the powders will come with more choice of colour. Powder must be applied over foundation whereas other types can be applied on bare skin.

What Colour should You Choose?

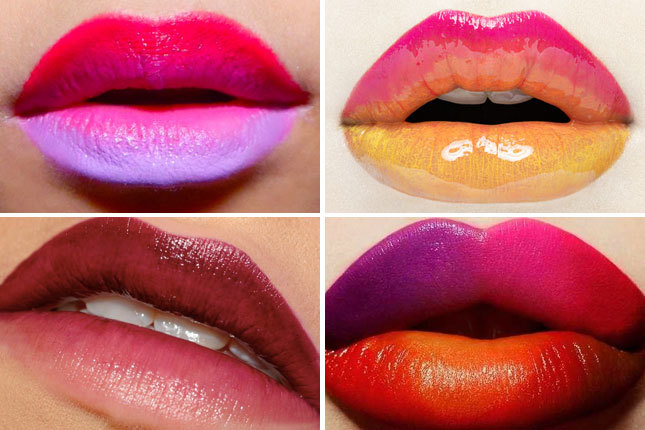
When choosing the colour of your blusher, you should first consider your skin tone and then, the look that you want to achieve. Now let’s consider the types of colours and how they work.

Cool colours – These are colours that tend to have a blue undertone and will add freshness and a healthy glow to your face. For light skin go for a pink and a plum or similar will work for darker skin. If you are wearing a brown or orangey lipstick don’t use a cool colour for your blusher.

Warm Colours – These will normally have orange undertones and they work best for contouring the cheeks and adding definition to the face. If you have a light complexion then you should think about using a light apricot whereas a burnt orange may be better for those with darker skin. Don’t use a warm blusher if you are going to wear a cool lipstick or a lip colour that has a blue undertone.

Universal Colours – These are those shades that generally come in between the cool and warm colours. The advantage of these is that they suit everyone and go with any share of lipstick. For light skin you are best to go with a peach, for medium skin rosewood works well and red is best for darker skin.

Natural Colours – These are the neutral beiges and browns. These have very little red in them and are best used as a bronzer rather than a blusher and can in fact be use alongside your usual blusher.

Unknown-3

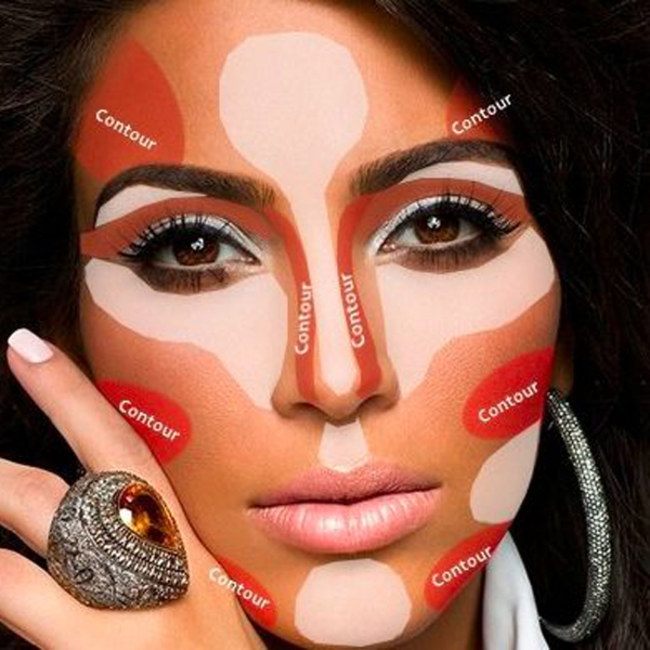
How to Apply your Blusher?
Now you have chosen the colour and type of blusher you are going to use let’s consider how to apply it. Below are the steps for applying powder blusher:

Step 1 – Never use the brush that comes with your blusher these are usually too small and will not give the right application. Get yourself a quality blusher brush before you start.

Step 2 – Look into the mirror and give yourself a big grin. This will allow you to see where the apple of your cheek is.

Step 3 – Dip the brush into the powder and remember to always shake off the excess before you begin. Brush over the apple of your cheek towards the ear using short up and down movements.

Step 4 – Now blend in the blusher. You can do this by adding a horizontal stroke over the vertical ones and then blot with a tissue.

For creams and gels follow the below steps:

Step 1 – Look into the mirror and give yourself a big grin. This will allow you to see where the apple of your cheek is.

Step 2 – Dab a small amount on the apple of your cheek and rub with your fingers. Ensure that you take the time to ensure this is blended properly.

TIP for the day:If you were at all worried about blusher you should not be now. Experiment, try different colours, just remember that blusher should be subtle and look natural.

Stay with us tomorrow as we talk about Mascara and Fake Lashes

STUDENTS TESTIMONIAL

Dubai Zombie challenge


I attended the three days Dubai zombie challenge that took place in wonderland, Dubai from 7th till 9th of April 2016

The event was organised and supervised by the famous French Le Manoir de Paris, they are specialised in makeup and special effects.

There were 2 amazing ladies Laura and Dalila they were responsible for the clients that wants to change into zombies, they took good care of them with smiles and love from the entrance till the makeup room, and they also were supervising the whole event.

Then another French person to train the new zombies, in addition to two more men that were responsible for all the details of the game from maintenance to the safety of the clients, They were very well organised and they planned everything that they even had first aid kit to help the clients.

First day i went before we start we had a meeting with the two professional French makeup artists Emilia and Camilla we were seven makeup artists in addition to them, by the second day we ended up in only 5 persons, they divide us as follows

  • One group for the latex
  • One group for the Air brush
  • One group for coloring details
  • One group for the final touch of clothes and hair and rest of the body
  • Camilla and Emilia took over the Air brush details and were also overlooking all the groups to make sure that we were on the right track

They also decide that we rotate every day so that we all get to learn everything in the process, also during the breaks they encouraged us to practice on our own bodies to learn more all the tricks.

They were both very supportive and helpful they treated us as a team, they fluded us with all the experience and data needed to make sure that we become experts in such a short time, doing all the tricks and moves live really made a difference with us.

They were answering all the questions asked, it was really not only an event it was like a professional special effects course and workshop at the same time.

We had a lot of fun with all of them we even had the chance to try the game itself .

I am really happy I was chosen to attend this event i learned totally new things in a very interesting filed of makeup which is the special effects, I want to thank Livia in the first place she is the one who recommended me to the group of the event, thanks for the support Lipstick Makeup institute.